Experience the Baskerville AI Firewall Control Panel in action with our live online demo. This environment is fully integrated with the Cloudflare ecosystem, using Workers to connect to the Baskerville machine learning clearinghouse. From the dashboard, you can explore Cloudflare’s traffic rules, mitigation tools, and analytics, all enhanced by Baskerville’s AI-powered detection engine.
Use the login below to access the demo environment. Any changes you make here are applied in real time and reflected on https://openports.dev
Access the demo:https://baskerville.ai/login
Username:demo
Password:demo
Control Panel guide
Global Configurations
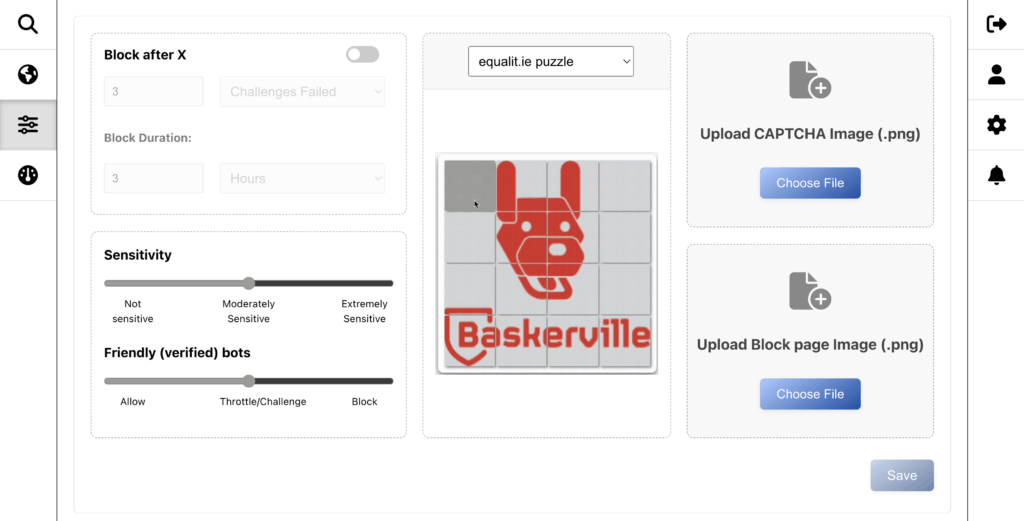
The Global Configurations panel lets you control the overall behaviour of Baskerville’s AI Firewall. The layout is divided into three main columns:
Left Column: Blocking Rules & Sensitivity
- Block after X: Define how many failed or repeated challenges a visitor must trigger before they are temporarily blocked. Blocking is based on a fingerprint, ensuring the same visitor is consistently identified.
- Block Duration: Choose how long the temporary block lasts (minutes, hours, or days).
- Sensitivity Slider: Adjust how aggressive the machine learning model is in issuing challenges.
- Not Sensitive: Fewer challenges, lower risk of false positives.
- Moderately Sensitive: Balanced detection.
- Extremely Sensitive: Aggressively challenges anomalous traffic.
- Friendly (Verified) Bots Slider: Decide how to treat well-known bots (e.g., Googlebot). Options include allowing, throttling/challenging, or blocking them.
Middle Column: Challenge Type
- Challenge Dropdown: Select the kind of challenge served to suspicious visitors. Options include:
- Puzzle: Requires solving a lightweight task.
- Turnstile: A Cloudflare-based alternative for frictionless verification.
Right Column: Branding & Images
- Upload CAPTCHA Image (.png): Upload a custom image (such as your logo) to display during challenges.
- Upload Block Page Image (.png): Provide an image to be shown on the block page when a visitor is denied access.
Saving Your Settings
After making changes, always click Save in the lower-right corner. Because this demo uses Cloudflare KV’s persistence model, updates can take up to 60 seconds to fully propagate.
Policies
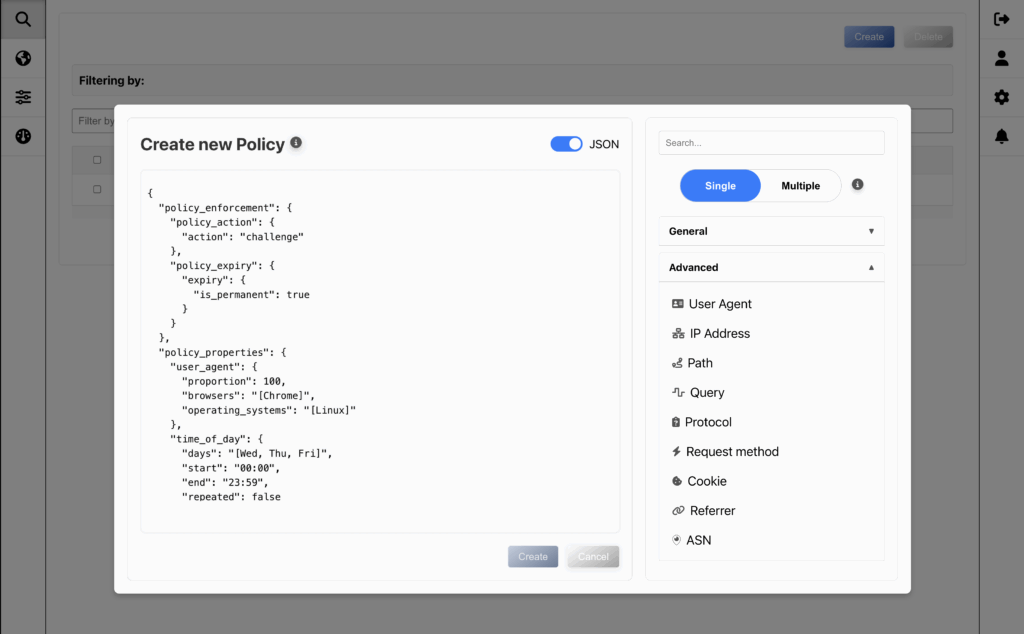
The Policies panel lets you define fine-grained rules for how Baskerville should respond to specific types of traffic. Creating a policy involves two main steps:
Step 1: Configure General Properties
Every policy must first include the required General properties. These define what action to take and the scope of enforcement:
- Action: Choose how the policy will respond when triggered – e.g., allow, challenge, block, or ban.
- Scope: Apply the policy globally, or narrow it down to a specific continent, country, or even a datacenter.
- Expiry: Decide whether the policy is permanent or temporary.
- Time of Day: Restrict the policy to run only during certain hours or days (e.g., business hours).
These settings establish the baseline: who the policy applies to, when it applies, and what it will do.
Step 2: Add Advanced Properties
Next, add at least one Advanced property to target the policy precisely. These ensure you aren’t applying rules indiscriminately, but rather to well-defined requesters. Options include:
- User Agent (browser, OS)
- IP Address
- Path or Query
- Protocol or Request Method
- Cookie or Referrer
- ASN (Autonomous System Number)
Even a single advanced property is enough to scope the rule toward a specific class of traffic.
Step 3: Create and Save
When the General and Advanced properties are set:
- Click Create to finalize the policy.
- Allow up to 60 seconds for Cloudflare’s KV storage to propagate the changes globally.